安装 Ubuntu 22.04 (LTS), Webmin, Nginx, MariaDB, PHP8.1-FPM,Perl-Fastcgi 到 DigitalOcean 的 VPS(2)
作者:
最后更新于 | 最初发布于 | 分类: 服务器和主机
安装 Ubuntu 22.04 (LTS), Webmin, Nginx, MariaDB, PHP8.1-FPM,Perl-Fastcgi 到 DigitalOcean 的 VPS
在第一部分,DavidYin 介绍了如何在 DigitalOcean 创建新 VPS,选择基本的 Ubuntu 22.04 LTS的系统。
下面是介绍如何安装 Webmin 这个主机控制面板和 SSH 的安全设置。这非常重要,安全性的事情,如何小心都不为过。
第二部分
最初的安全更新
首先,我使用的是 Putty,这是一个 SSH 工具,先用 putty 登录 VPS,IP 地址可以登录到 DigitalOcean 后台看到,用户名就是 root,密码是自己设置的那个密码。
登录到 VPS 之后,执行 apt update,查询软件库的信息。
root@fig:~# apt update
Hit:1 https://repos.insights.digitalocean.com/apt/do-agent main InRelease
Hit:2 https://repos-droplet.digitalocean.com/apt/droplet-agent main InRelease
Get:3 http://mirrors.digitalocean.com/ubuntu jammy InRelease [270 kB]
Get:4 http://security.ubuntu.com/ubuntu jammy-security InRelease [110 kB]
Hit:5 http://mirrors.digitalocean.com/ubuntu jammy-updates InRelease
Hit:6 http://mirrors.digitalocean.com/ubuntu jammy-backports InRelease
Fetched 380 kB in 8s (50.5 kB/s)
Reading package lists... Done
Building dependency tree... Done
Reading state information... Done
28 packages can be upgraded. Run 'apt list --upgradable' to see them.
W: https://repos.insights.digitalocean.com/apt/do-agent/dists/main/InRelease: Key is stored in legacy trusted.gpg keyring (/etc/apt/trusted.gpg), see the DEPRECATION section in apt-key(8) for details.
root@fig:~#
这里有一条警告信息,是关于 DigitalOcean 自己的那个 Monitoring 软件库的信息的,暂时先忽略它。后面会有一个解决办法。
这里可以看到有28个软件包有更新,那么就执行 apt upgrade 来完成更新。
root@fig:~# apt upgrade
Reading package lists... Done
Building dependency tree... Done
Reading state information... Done
Calculating upgrade... Done
The following NEW packages will be installed:
  linux-headers-5.15.0-30 linux-headers-5.15.0-30-generic linux-image-5.15.0-30-generic
  linux-modules-5.15.0-30-generic
The following packages will be upgraded:
  base-files distro-info-data git git-man libcurl3-gnutls libfribidi0 libnss-systemd libpam-systemd libssl3
  libsystemd0 libudev1 linux-headers-generic linux-headers-virtual linux-image-virtual linux-virtual
  motd-news-config networkd-dispatcher openssl python3-software-properties python3-twisted rsyslog snapd
  software-properties-common systemd systemd-sysv systemd-timesyncd ubuntu-advantage-tools udev
28 upgraded, 4 newly installed, 0 to remove and 0 not upgraded.
10 standard security updates
Need to get 87.3 MB of archives.
After this operation, 224 MB of additional disk space will be used.
Do you want to continue? [Y/n]
选择 Y 继续,完成安装,因为有个 Linux 核心的更新,升级完成后会询问是否重启,按回车 OK,还会问有哪些服务要重启,这里就不用管它了,因为整个系统都要重启了,再按一次回车就可以了。对了重启命令是 shutdown now -r。
安装 Webmin 控制面板,SSH 安全设置
为什么要安装 Webmin?
主要就是我习惯使用,用了很多年了。一直在用 Webmin 管理面板,可以很方便的更新系统,安装 perl 包,添加 MySQL 数据库;第二,在出现错误的时候,查看 log 日志,还有很多很多其它功能。
安装 Webmin
参考 webmin 官方的安装 Webmin 到 Debian 系统的做法。
使用添加 Webmin APT 源的方式来安装。新建一个文件 nano /etc/apt/sources.list.d/webmin.list
deb [signed-by=/usr/share/keyrings/jcameron-key.gpg] https://download.webmin.com/download/repository sarge contrib 接着导入GPG 密钥如下。
cd /root
wget https://download.webmin.com/jcameron-key.asc
cat jcameron-key.asc | gpg --dearmor >/usr/share/keyrings/jcameron-key.gpg
再之后就可以安装了。
apt-get install apt-transport-https
apt-get update
apt-get install webmin
安装完成之后,在桌面浏览器(比如 chrome)中输入下面的网址来访问安装好的 Webmin 控制面板。
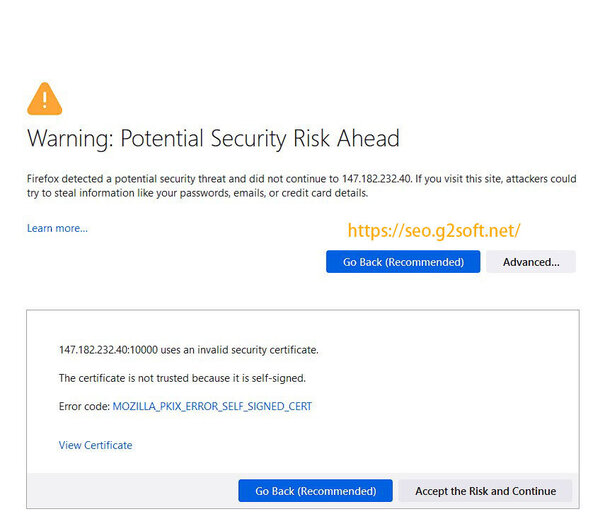
https://147.182.232.40:10000
然后会出现"Your connection is not private"的警告信息,点击 Advanced。

然后点击 "Accept the Risk and Continue",就可以继续载入登录页面了。
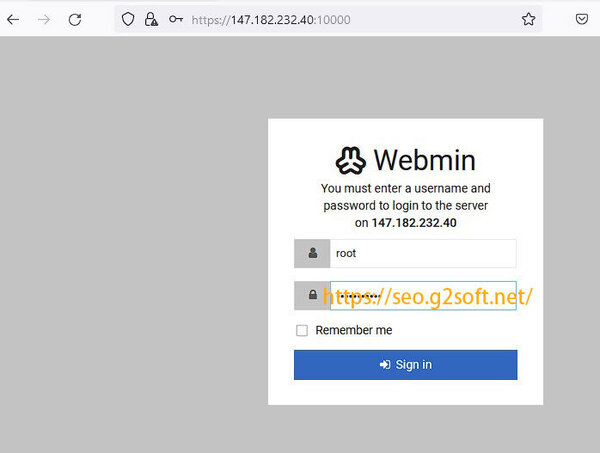
 看到登录页面,输入之前的 root 和对应的密码。
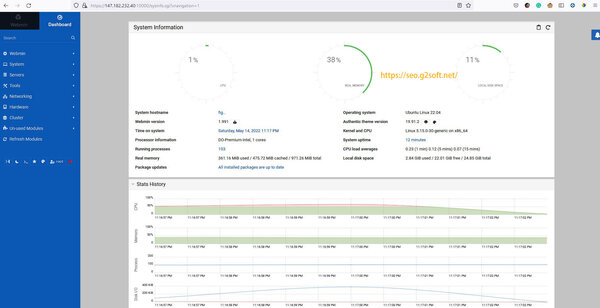
 Webmin 默认安装的用户界面是响应式,而我主要在桌面电脑上使用,还是更喜欢传统的界面。
 修改响应式模板的方式如下:点击左侧的 Webmin 》 Webmin Configuration 》 Webmin Themes,然后选择 "Change theme" 标签页,修改当前 theme,改为 Gray Framed theme。
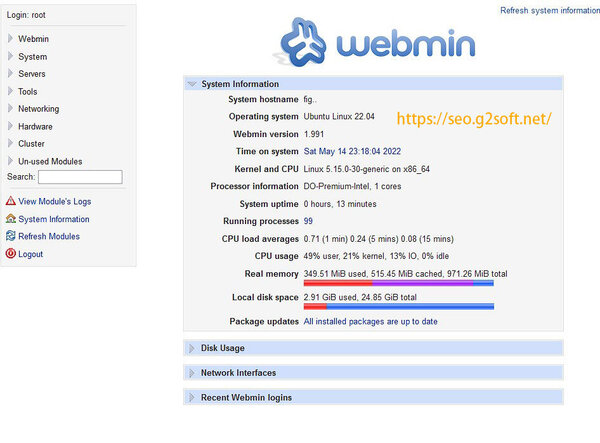 这样的传统界面,载入速度更快。
看看当前我所创建的这个 VPS 的参数:
- Operating system Ubuntu Linux 22.04
- Webmin version 1.991
- Kernel and CPU Linux 5.15.0-30-generic on x86_64
- Processor information DO-Premium-Intel, 1 cores
- Running processes 101
- CPU load averages 0.24 (1 min) 0.05 (5 mins) 0.02 (15 mins)
- CPU usage 90% user, 2% kernel, 1% IO, 0% idle
SSH安全设置
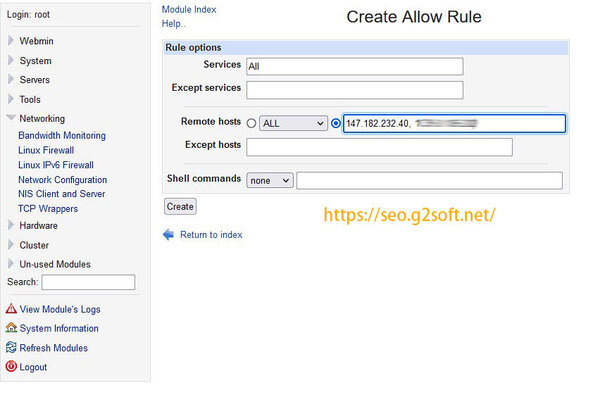
为了 SSH 的安全,我会在 TCP wrappers 处添加两条规则,只允许来自指定的 IP 地址的电脑以 SSH 的方式连上服务器。
左侧,Networking 》TCP Wrappers。
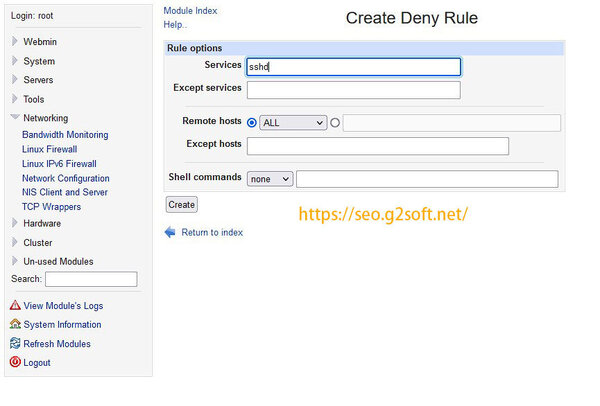
在 Allow 规则处,允许 ALL Services, Remote Hosts 的地方输入服务器 IP 和我所指定的IP,(就是我自己的 IP 地址)在 Deny 规则处,Services 填写 sshd ,Remote Hosts 选 All。
 这样设置完成后,来自指定 IP 地址的 SSH 访问不会受影响,除此之外的 IP,若访问 SSH 服务的话,就会直接被拒绝。比如下面的记录可以看到,短短一个小时,有莫名奇妙的 IP 试图以 root 身份连上 SSH,用不同的端口,尝试密码,当然出错返回,但都会消耗 VPS 资源,大多是自动扫描的工具,设置 TCP Wrapper 之后,就直接 refused 了,连密码尝试的机会都不会给。
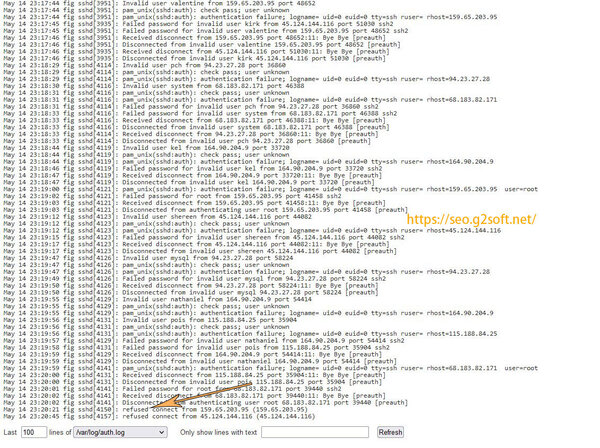 查看日志记录: 左侧 System 》 System Logs》File /var/log/auth.log Yes auth,authpriv.* 》点击 View,可以看到这么多尝试登录失败的。
添加新用户
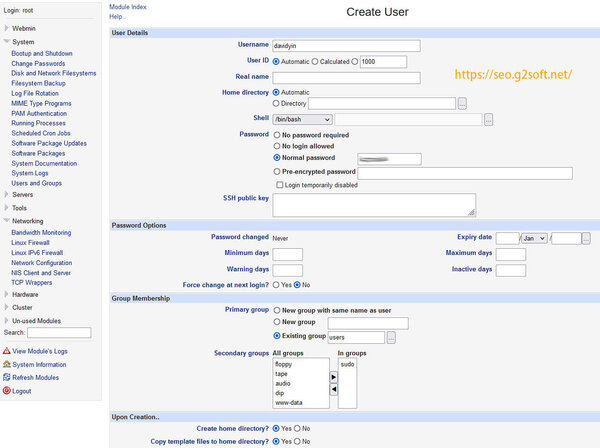
Ubuntu 系统平时不建议以 root 用户直接登录操作,而是应该用普通用户,如果需要执行 root 用户的权限,那就采用 sudo 方式。下面就是在 Webmin 的管理面板中进行添加新用户。
在左侧,选择 System 》 Users and Groups, 然后选择 Create a new user,比如用户名输入 davidyin,选择 Normal password 输入自己设定的密码,Shell 这块我会选择 /bin/bash ,然后在 primary group 的地方,默认是选择已存在的用户组 users。在 Second group 的地方我会把 sudo 组加入,这样以后就只用登入这个用户来操作,即使执行更高权限的操作,也只需要 sudo 就可以了。
为什么没有安装 FTP 服务器?
很多年前,我有用 proftpd 作为 VPS 上的 FTP 服务器,但是后来觉得既然可以直接使用 SFTP,就是 SSH File Transfer Protocol,简而言之,就是利用 SSH 来传输文件的方式,为什么还要安装 FTP服务器呢?第一,ssh 更加安全;第二,服务器上可以少安装一样服务,节约内存,并且少一个可能的安全漏洞。
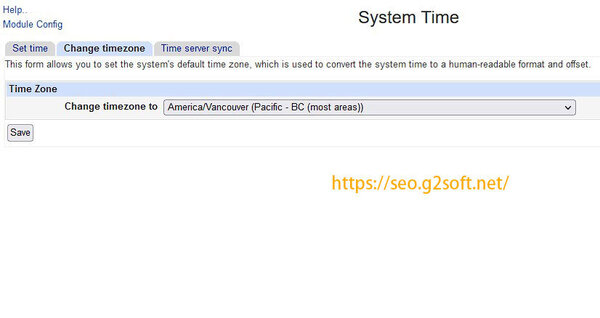
设置时区
设置时区就可以自动把系统时间同步到我所在的本地时间。
左侧,Hardware 》 System Time, 选择 Change Timezone 标签,在时区修改的下拉菜单,改为 America/Vancouver (Pacific -BC (most areas)),点击保存。现在 VPS 显示的时间就是我所在的温哥华地区了。
 接下里要设置加拿大 NTP 服务器,让VPS 的时间能定时与世界原子钟同步。
左侧,Hardware 》 System Time, 选择 Time Server sync 标签,在 Timneserver hostnames or address 这里填写 ca.pool.ntp.org,其它设置看下图。
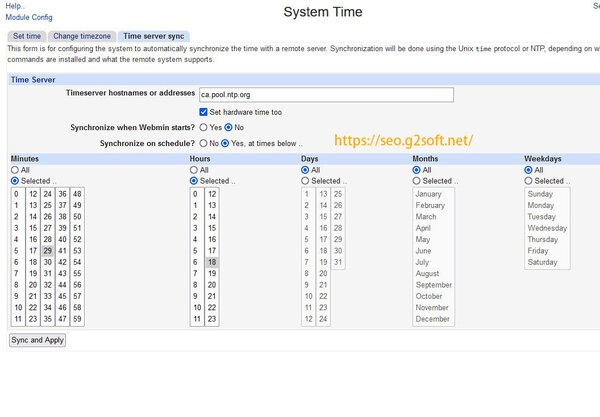 如果出现下面错误信息
NTP time synchronization failed : Missing ntpdate and sntp commands那么就需要到安装以下软件包:
apt install ntpdate sntp这样设置,是为了让系统在每天的18点29分同步一次时钟。
至此, Ubuntu 22.04 LTS,Webmin控制面板,以及时区设置,SSH的安全设置都完成了。接下来是介绍如何安装 Nginx Web 服务器,MariaDB数据库服务器,php等等。
分享:
相关的文章
- 安装 Ubuntu 20.04, Webmin, Nginx, MariaDB, PHP7.4-FPM,Perl-Fastcgi 到 DigitalOcean 的 VPS(2)
- 安装 Ubuntu 18.04, Webmin, Nginx, MariaDB, PHP7.2-FPM,Perl-Fastcgi 到 Linode 的 VPS(2)
- 安装 Ubuntu 16.04, Webmin, Nginx, MariaDB, PHP7.1-FPM,Perl-Fastcgi 到 Vultr.com 的 VPS(2)
- 安装 Ubuntu 24.04 (LTS), Webmin, Nginx, MariaDB, PHP8.3-FPM,Perl-Fastcgi 到 DigitalOcean 的 VPS(2)
- 尝试一下宝塔面板
- 安装 Ubuntu 24.04 (LTS), Webmin, Nginx, MariaDB, PHP8.3-FPM,Perl-Fastcgi 到 DigitalOcean 的 VPS(6)
- 安装 Ubuntu 24.04 (LTS), Webmin, Nginx, MariaDB, PHP8.3-FPM,Perl-Fastcgi 到 DigitalOcean 的 VPS(5)
- 安装 Ubuntu 24.04 (LTS), Webmin, Nginx, MariaDB, PHP8.3-FPM,Perl-Fastcgi 到 DigitalOcean 的 VPS(1)