安装 Ubuntu 16.04, Webmin, Nginx, MariaDB, PHP7.1-FPM,Perl-Fastcgi 到 Vultr.com 的 VPS(4)
作者:
最后更新于 | 最初发布于 | 分类: 服务器和主机
第四部分
前面介绍了VPS的选择,Ubuntu 16.04 LTS 的安装,Webmin 控制面板的安装,以及 Nginx Web 服务器,MariaDB数据库服务器的安装。下面我们来进一步的介绍对于 php 和 perl 语言的支持。
安装 php7.1-fpm
第一步添加源,并更新系统。
sudo apt install -y python-software-properties
sudo add-apt-repository -y ppa:ondrej/php
sudo apt update
sudo apt upgrade
使用下面命令来查看可以用来安装的 php7.1 的软件包们。
apt-cache pkgnames | grep php7.1根据我的需要,执行下面的命令安装 php7.1 有关的软件包。
sudo apt install -y php7.1 php7.1-fpm php7.1-cli php7.1-common php7.1-mbstring php7.1-gd php7.1-intl php7.1-xml php7.1-mysql php7.1-mcrypt php7.1-zip php7.1-json php7.1-curl安装完成后,在终端输入 php -v , 可以看到版本信息。
PHP 7.1.8-2+ubuntu16.04.1+deb.sury.org+4 (cli) (built: Aug  4 2017 13:04:12) ( NTS )
Copyright (c) 1997-2017 The PHP Group
Zend Engine v3.1.0, Copyright (c) 1998-2017 Zend Technologies
    with Zend OPcache v7.1.8-2+ubuntu16.04.1+deb.sury.org+4, Copyright (c) 1999-2017, by Zend Technologies
接下来先设置一下 php7.1-fpm。编辑 /etc/php/7.1/fpm/pool.d/www.conf文件。 把里面的用户和组的名称从 www-data 替换成 nginx 。如果 web 服务器是 Apache 的话,就不用改了,而这里是 nginx web 服务器。
这里也可以看到这行: listen = /run/php/php7.1-fpm.sock 修改完毕后重启 php7.1-fpm服务sudo service php7.1-fpm restartphp.ini 配置文件的位置在 /etc/php/7.1/fpm/php.ini,如果有需要修改参数,比如上传大小的限制等,可以修改此文件。
主机设置
接下来我要设置一个vhost,就是一个虚拟主机,我用的域名是 whovpn.com,此为举例而已。 到域名服务商处,把 whovpn.com 和 www.whovpn.com 两个 A 记录都指向此 VPS 的 IP 地址,生效可能需要十分钟或更久,为快捷,可以在所操作的Windows hosts 文件添加纪录使之在本地立即可用。
新建一个主机配置文件,whovpn.conf,如下。
sudo nano /etc/nginx/conf.d/whovpn.conf
server {
    listen       80;
    server_name  whovpn.com www.whovpn.com;
    access_log  /var/log/nginx/host.access.log  main;

    root   /home/davidyin/whovpn.com;
    index  index.php index.html index.htm;

    location / {
        try_files $uri $uri/ = 404;
    }

    # redirect server error pages to the static page /50x.html
    #
    error_page   500 502 503 504  /50x.html;
    location = /50x.html {
        root   /usr/share/nginx/html;
    }

    location ~ \.php$ {
        fastcgi_split_path_info ^(.+\.php)(/.+)$;
        fastcgi_pass unix:/var/run/php/php7.1-fpm.sock;
        fastcgi_index index.php;
        fastcgi_param SCRIPT_FILENAME $document_root$fastcgi_script_name;
        include fastcgi_params;
    }

    # deny access to .htaccess files, if Apache's document root
    # concurs with nginx's one
    #
    location ~ /\.ht {
        deny  all;
    }
}
用下面命令查看是否配置正确。若正确,就重启nginx生效。
davidyin@whovpn:/etc/nginx/conf.d$ sudo nginx -t
nginx: the configuration file /etc/nginx/nginx.conf syntax is ok
nginx: configuration file /etc/nginx/nginx.conf test is successful
davidyin@whovpn:/etc/nginx/conf.d$ sudo service nginx restart
在/home/davidyin/whovpn.com/下新建一个文件 info.php
输入如下内容:
<?php
phpinfo();
然后在浏览器中输入网址 http://www.whovpn.com/info.php 看到如下的 php 信息。
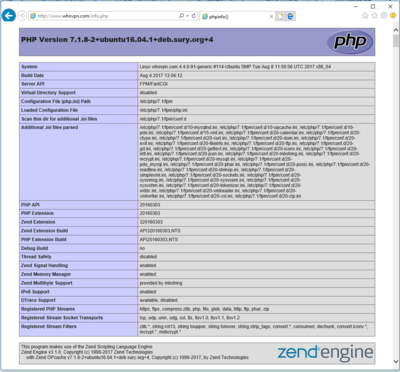
如果出现问题,可以查看这几个日志文件。
- /var/log/nginx/host.access.log
- /var/log/nginx/error.log
至此 php7.1-fpm 已经安装完毕,在网站中已经可以使用了,下面先介绍如何添加 SSL 证书,并自动更新。
签发 Let's Encrypt SSL 证书
这里我采用的是 Neilpang 的方法和工具。参考这里。
安装工具:davidyin@whovpn:~$ curl https://get.acme.sh | sh
% Total % Received % Xferd Average Speed Time Time Time Current
Dload Upload Total Spent Left Speed
100 705 100 705 0 0 529 0 0:00:01 0:00:01 --:--:-- 529
% Total % Received % Xferd Average Speed Time Time Time Current
Dload Upload Total Spent Left Speed
100 149k 100 149k 0 0 293k 0 --:--:-- --:--:-- --:--:-- 293k
[Sat Aug 12 08:22:33 UTC 2017] Installing from online archive.
[Sat Aug 12 08:22:33 UTC 2017] Downloading https://github.com/Neilpang/acme.sh/archive/master.tar.gz
[Sat Aug 12 08:22:34 UTC 2017] Extracting master.tar.gz
[Sat Aug 12 08:22:34 UTC 2017] Installing to /home/davidyin/.acme.sh
[Sat Aug 12 08:22:34 UTC 2017] Installed to /home/davidyin/.acme.sh/acme.sh
[Sat Aug 12 08:22:34 UTC 2017] Installing alias to '/home/davidyin/.bashrc'
[Sat Aug 12 08:22:34 UTC 2017] OK, Close and reopen your terminal to start using acme.sh
[Sat Aug 12 08:22:34 UTC 2017] Installing cron job
no crontab for davidyin
no crontab for davidyin
[Sat Aug 12 08:22:34 UTC 2017] Good, bash is found, so change the shebang to use bash as preferred.
[Sat Aug 12 08:22:34 UTC 2017] OK
[Sat Aug 12 08:22:34 UTC 2017] Install success!它是把工具安装到了用户目录 ~/.acme.sh/
验证域名有两种方式,DNS和http,我觉得DNS方式更为方便,下面就用这个方法,证书可以多域名的。此处我选择了椭圆曲线算法。.acme.sh/acme.sh --issue --dns -d whovpn.com -d www.whovpn.com --keylength ec-256返回结果里,生成两个字符串,分别给上面的两个域名,要在域名管理的地方,添加两条 txt 记录。待生效之后,就可以签发了。
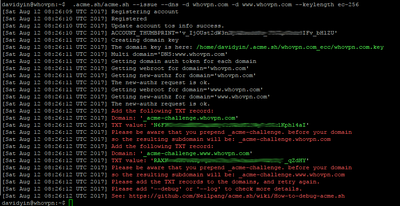 检查域名的 txt 记录生效与否可以用 https://mxtoolbox.com/TXTLookup.aspx 工具查询。
签发证书的命令:
.acme.sh/acme.sh --renew -d whovpn.com -d www.whovpn.com --eccdavidyin@whovpn:~$ .acme.sh/acme.sh --renew -d whovpn.com -d www.whovpn.com --ecc
[Sat Aug 12 08:40:19 UTC 2017] Renew: 'whovpn.com'
[Sat Aug 12 08:40:19 UTC 2017] Multi domain='DNS:www.whovpn.com'
[Sat Aug 12 08:40:19 UTC 2017] Getting domain auth token for each domain
[Sat Aug 12 08:40:19 UTC 2017] Verifying:whovpn.com
[Sat Aug 12 08:40:22 UTC 2017] Success
[Sat Aug 12 08:40:22 UTC 2017] Verifying:www.whovpn.com
[Sat Aug 12 08:40:25 UTC 2017] Success
[Sat Aug 12 08:40:25 UTC 2017] Verify finished, start to sign.
[Sat Aug 12 08:40:26 UTC 2017] Cert success.
-----BEGIN CERTIFICATE-----
MIIEPDCCAySgAwIBAgISAwt8fwaac0kK4N4RMOYBqx7ZMA0GCSqGSIb3DQEBCwUA
省略
RMhTAYjMRMO9d1jhfZBGBEggXxnmii3vnGlF5pUMVak=
-----END CERTIFICATE-----
[Sat Aug 12 08:40:26 UTC 2017] Your cert is in /home/davidyin/.acme.sh/whovpn.com_ecc/whovpn.com.cer
[Sat Aug 12 08:40:26 UTC 2017] Your cert key is in /home/davidyin/.acme.sh/whovpn.com_ecc/whovpn.com.key
[Sat Aug 12 08:40:26 UTC 2017] The intermediate CA cert is in /home/davidyin/.acme.sh/whovpn.com_ecc/ca.cer
[Sat Aug 12 08:40:26 UTC 2017] And the full chain certs is there: /home/davidyin/.acme.sh/whovpn.com_ecc/fullchain.cer这里看到一切正常,证书已经生成,下面安装。
我习惯是安装在 /etc/nginx/ssl/whovpn.com/ 之下,如果有其它域名的证书,比如 g2soft.net 的证书,就放在 /etc/nginx/ssl/g2soft.net/下。
sudo mkdir /etc/nginx/ssl
sudo mkdir /etc/nginx/ssl/whovpn.com
sudo .acme.sh/acme.sh --installcert -d whovpn.com -d www.whovpn.com \
--key-file /etc/nginx/ssl/whovpn.com/private.key \
--fullchain-file /etc/nginx/ssl/whovpn.com/fullchain.cer \
--reloadcmd "service nginx force-reload" \
--ecccd /etc/nginx/ssl
sudo openssl dhparam -out dhparam.pem 4096Let's Encrytp 的证书已经签发,三个月有效,这个acme.sh工具会自动更新,现在只是做了准备工作,下面会继续介绍,如何在 nginx 配置文件中使用证书,以及重定向和满足 HSTS Preload 的要求。


评论